> For the complete documentation index, see [llms.txt](https://faq.wanttopay.net/wanttopay-app/llms.txt). Markdown versions of documentation pages are available by appending `.md` to page URLs; this page is available as [Markdown](https://faq.wanttopay.net/wanttopay-app/english/esim-dlya-puteshestvii/kak-ustanovit-esim.md).
# How to install eSIM
In this section, we have collected step-by-step instructions for different types of devices
[📱 Installing eSIM on iPhone](#esli-u-vas-ios)
[🤖 Installing eSIM on Android](#esli-u-vas-android)
### If you have iOS
You can install eSIM in three ways: by QR code, by link, or manually. We recommend starting with the QR code — it’s the fastest and easiest way. If that doesn’t work, use the installation link or manual setup.
**💡 Before you begin installation** make sure that:
* the phone supports eSIM;
* the device is connected to the internet;
* the QR code or installation details are at hand.
During installation, do not close your phone settings or turn off the internet. If the connection is interrupted, the eSIM may not install.
#### How to install eSIM on iPhone using a QR code
1. Open the Camera app and scan the QR code you received in the [Wanttopay bot](https://telegram.me/WantToPayBot?start=w17851188--luMLI).
2. Tap **“Activate”**when the iPhone prompts you to add a new cellular plan.
3. Wait for the connection to the carrier to finish; this may take a few minutes. Then tap **“Continue”**.
{% columns %}
{% column %}
{% endcolumn %}
{% column %}
{% endcolumn %}
{% column %}
{% endcolumn %}
{% endcolumns %}
4. On the screen **“Where will you use this eSIM card?”** choose **“Abroad”** and press **“Continue”**.
5. On the plan selection screen, choose **“Data only”** and press **“Continue”**.
6. Tap **“Done”** after setup is complete. The new eSIM will appear in the **Settings → Cellular**.
{% columns %}
{% column %}
{% endcolumn %}
{% column %}
{% endcolumn %}
{% column %}
{% endcolumn %}
{% endcolumns %}
#### **How to install eSIM via link**
1. Open the eSIM installation link on your iPhone — it should come in the [Wanttopay bot](https://telegram.me/WantToPayBot?start=w17851188--luMLI).
2. Tap **“Activate”**when the iPhone prompts you to add a new cellular plan.
3. Tap **“Continue”** and follow the on-screen prompts.
4. On the plan selection screen, choose **“Data only”** and press **“Continue”**.
5. Tap **“Done”** after setup is complete.
💡 **Installation via link is almost no different from installation via QR code.** After opening the link, you will see the same screens and go through the same setup steps. Follow the screenshots above.
#### **How to install eSIM manually**
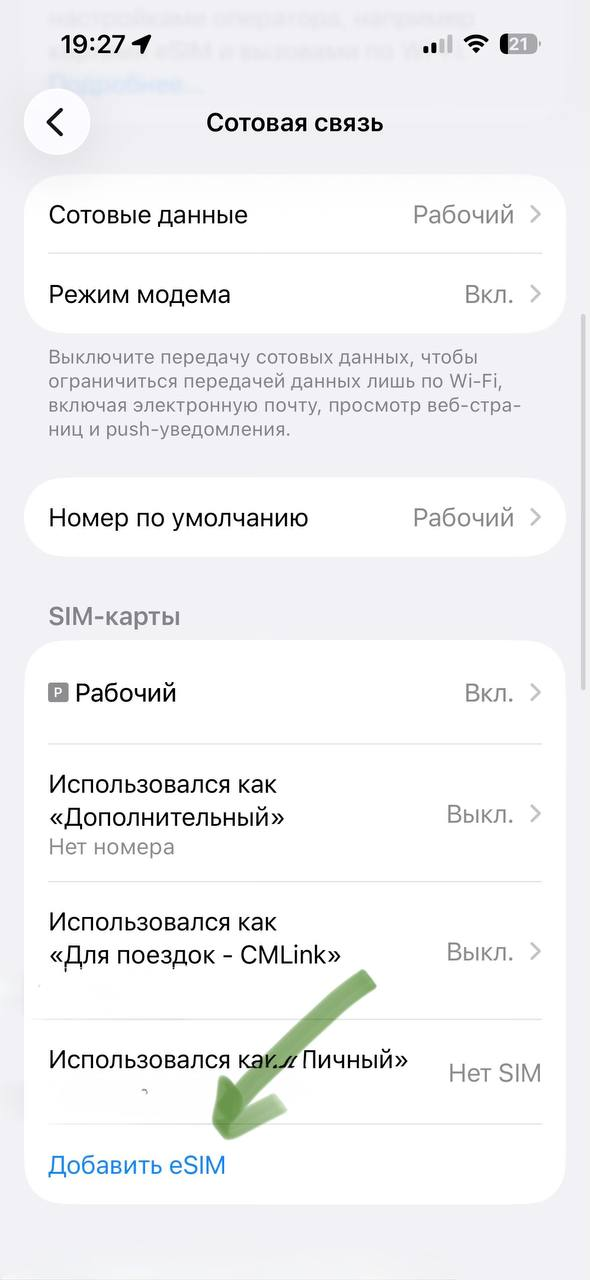
1. Open **Settings** → **Cellular** → **“Add eSIM”**.
2. On the screen **“Set up eSIM”** choose **“By QR code”** → **“Scan QR code”.**
3. Select **“Enter details manually”**.
4. Enter **SM-DP+ address** and **activation code**received via [Wanttopay bot](https://telegram.me/WantToPayBot?start=w17851188--luMLI). Leave the confirmation code field blank.
5. Tap **“Next”** and wait for the installation to complete.
{% columns %}
{% column %}
{% endcolumn %}
{% column %}
{% endcolumn %}
{% column %}
{% endcolumn %}
{% endcolumns %}
### What to do after installation?
Before traveling, make sure the eSIM is shown in your device settings and is turned on. The internet may not work right away, but that’s normal — the eSIM will connect to the network after you arrive in another country. **Also make sure data roaming is enabled for the eSIM.**
To avoid unnecessary charges:
* turn off mobile data on the primary SIM card;
* use the installed eSIM for data.
If you are already in another country and the internet hasn’t appeared, restart your phone or turn on airplane mode for 10–15 seconds
***
### If you have Android
You can install eSIM in three ways: by QR code, by link, or manually. We recommend starting with the QR code — it’s the fastest and easiest way. If that doesn’t work, use the installation link or manual setup.
Menu item names and the order of steps may vary slightly depending on the device model and operating system version.\
\
**💡 Before you begin installation** make sure that:
* the phone supports eSIM;
* the device is connected to the internet;
* the QR code or installation details are at hand.
During installation, do not close your phone settings or turn off the internet. If the connection is interrupted, the eSIM may not install.
### How to install eSIM on Android using a QR code
1. Open **“Settings”** and go to **“Connections”**, then go to **“SIM card manager”.**
2. Tap **“Add eSIM”**.
3. Select **“Scan QR code”** and scan the QR code you received in the [Wanttopay bot](https://t.me/WantToPayBot?start=w17851188--luMLI).
4. Wait for the eSIM data check to finish and confirm the addition, then wait for the installation to complete.
5. Make sure the new eSIM is enabled in your device settings.
### How to install eSIM via link
1. Open the eSIM installation link — it should come in the [Wanttopay bot](https://telegram.me/WantToPayBot?start=w17851188--luMLI).
2. Confirm adding the eSIM on the device.
3. Wait for the installation to complete and follow the on-screen prompts.
💡 Installation via link is almost no different from installation via QR code. After opening the link, you will see the same screens and go through the same setup steps.
### How to install eSIM manually
1. Copy the SM-DP+ address and activation code you received in the [Wanttopay bot](https://telegram.me/WantToPayBot?start=w17851188--luMLI).
2. Open **“Settings”** on the device.
3. Go to the section **“Network & internet”**, **“Connections”** or **“SIM manager”**.
4. Tap **“Add eSIM”** or **“Add mobile plan”**.
5. Select **“Enter details manually”** and enter the SM-DP+ address and activation code.
6. Wait for the installation to complete and make sure the new eSIM is enabled in your device settings.
### What to do after installation?
Before traveling, make sure the eSIM is shown in your device settings and is turned on. The internet may not work right away, but that’s normal — the eSIM will connect to the network after you arrive in another country. **Also make sure data roaming is enabled for the eSIM.**
To avoid unnecessary charges:
* turn off mobile data on the primary SIM card;
* use the installed eSIM for data.
If you are already in another country and the internet hasn’t appeared, restart your phone or turn on airplane mode for 10–15 seconds.
---
# Agent Instructions
This documentation is published with GitBook. GitBook is the documentation platform designed so that both humans and AI agents can read, navigate, and reason over technical content effectively. Learn more at gitbook.com.
## Querying This Documentation
If you need additional information that is not directly available in this page, you can query the documentation dynamically by asking a question.
Perform an HTTP GET request on the current page URL with the `ask` query parameter, and the optional `goal` query parameter:
```
GET https://faq.wanttopay.net/wanttopay-app/english/esim-dlya-puteshestvii/kak-ustanovit-esim.md?ask=&goal=
```
`ask` is the immediate question: it should be specific, self-contained, and written in natural language.
`goal` is optional and describes the broader end goal you are ultimately trying to accomplish on behalf of the user. GitBook uses it to tailor the answer towards what is most useful for that goal.
The response will contain a direct answer to the question and relevant excerpts and sources from the documentation.
Use this mechanism when the answer is not explicitly present in the current page, you need clarification or additional context, or you want to retrieve related documentation sections.




.png?alt=media&token=1a598cec-e1aa-4c43-b683-246975586cad)
.png?alt=media&token=9fda2a7a-871a-4f63-9270-e01f39706016)
.png?alt=media&token=41390b18-59e5-46c8-b96b-0035130c1a3a)
.png?alt=media&token=06455f76-ccd3-4671-87b4-3d91dfefdb92)

.png?alt=media&token=7365d419-4571-4d23-a380-d1065b5c0df8)